Wednesday, April 23, 2014

How to Eat a Pomegranate: Spring is Here and that Means Pomegranates are Back!

I Just Had My First Pomegranates of the Season!!!


I love the winter, but it is an inexplicable sadness every time I realize when pomegranate season is over. I don't judge Persephone for being tempted by Hades' food in the underworld; I'm sure his pomegranates were delicious. Pomegranates are sweet and tangy. Those ruddy shells hide ruby red arils of goodness.
                     CC Image: Henry Siddon Mowbray "The Marriage of Persephone"

How do you eat your pomegranate?

There are many gimmicks for how to eat a pomegranate quickly, but I have found most of them don't work. I have tried opening pomegranates in water and even tapping out the arils, but it normally takes the same amount of time as the normal way & you lose a lot of juice. If you want to get the most out of your pomegranate the old fashioned way is the best. Warning: wear an apron or a shirt you don't care about getting juice on. The juice may spray & stain.
  • Get a knife & a bowl. A pairing knife may work best. The bowl is to catch any juices; you can drink those later. You will be doing all your work in the bowl.
  • Place you pomegranate Calyx up.
  • Cut across the Calyx so that you have created an X in the "top". Go deep enough that you get through the Albido, but not so deep that you knick your Arils.
  • Using you fingers separate one of the quadrants you have made in the top & pull that part separate from the rest. Continue pulling your pomegranate apart like this until it is all separated.
  • Then slowly work the Arils out of the membrane with your fingers & into the bowl. Most of the Arils should be exposed now that you have quartered the pomegranate.
  • If you need to, you can cut the skin in other places and pull the quarters into smaller pieces.
  • Compost your peels and enjoy!

                                                      CC Image by Fir0002/Flagstaffotos

I enjoy eating my pomegranates from the bowl with a spoon. I eat it seeds and all. I find that the seeds give the fruit a nice nutty flavor.


Terminology on pomegranates found from http://www.pomegranates.tv/information.html.

Wednesday, April 9, 2014

How to Make the Most Beautiful Candle. Fruit Hacks That Are Truly Elegant.

(Instructions below.)

I was playing around on Youtube and I ran across "9 Fruit Hacks For A Happier Life" by BuzzFeedYellow. BuzzFeedYellow is one of my favorite channels on youtube, it has many amusing videos that are often informative as well as humorous. I think it is worth it to go check their videos out. There is a little something for anyone.

Using BuzzFeedYellow's video I made a candle out of an Orange. It was stunning & surprisingly burned for a few hours. This would be a great conversation starter for a special event or even just sitting around. What better mood lighting than glowing fruit. You can also use fruit besides oranges, so long as there are fibrous tissues inside the fruit. For example, lemons, limes, grapefruit, all would make great candles.

My second favorite of BuzzFeedYellow's hacks: frozen grapes. I already love frozen grapes as a snack, especially in the summer. It makes the flavors really pop, but BuzzFeedYellow had the great idea of using frozen grapes to cool drinks. Wine, soda, water, whiskey. That way your drinks don't dilute, you don't have to pay for those expensive whiskey stones, they look beautiful, and you get a delicious snack at the end of your drink.

Below I have a video of some of the orange candles I made. Aren't they beautiful?

How do you make an orange candle?

The concept is very straight forward. You simply halve the fruit, cut out a hole in the top half, use olive oil(or substitute) for the fuel and the fruit as the wick, and burn away. If you want more details read below.
  1. Cut your citrus' peel in half. Make your cut as straight as possible, this will make later steps much easier. Any knife should work, but a pairing knife might be easier than a butter knife.
  2. Make your wick. Peel back the lip so that you can carefully remove the fruit within. Make sure to keep part of the white fibrous tissue that runs down the center intact. This will become your wick. You do not want it to be too tall or too short. It will burn best if it is about half its original size and medium thickness. The half without the 'belly button' nub will most likely be the flattest and make the best candle base. Aim to maintain the wick in that half.
  3. Take the top half of the peel and cut a circle in the top to let out the heat from the flame. Make sure that it is big enough that the flame will not hit it and burn the peel.
  4. Pour Olive Oil (or I would assume any oil you want... don't be silly and use anything too intense. Perhaps scented oils might be fun. Let me know if you try any.) into the base of the candle. Pour it over the wick and only pour enough so that you have some standing in the base. If you immerse your wick then it wont burn properly.
  5. Wait a little (about a minute) for the oil to soak into your wick. This should make it burn better.
  6. Then put the top half back on and light your wick. It may take a moment, be patient. I would recommend putting your candle in a bowl for security.
(Be careful please. Don't forget to keep the fire contained & have something to put it out on hand. Do not use water, since you are dealing with hot oil. Hot oil and Water are a bad combination. Do not leave your candle unattended.)

My Favorite Lipstick Right Now: Bare Minerals Marvelous Moxie™ Lipstick


Why do I love this lipstick? because...
  • It has great pigment and its moisturizing. My lips run on the drier side, so many lipsticks dry my lips out or don't sit well on my lips (instead they get that wan patchy look).
  • Moxie™ gives me a smooth application. It is very creamy and rich.
  • It looks great and feels great.
  • There are a myriad of colors to choose from and each one is high in pigment, so you don't have to make multiple swipes.


I have this lip color in Stand Out, Lead the Way, and Never Say Never. Each shade is very different.


Stand Out

This is a lovely shade of brown toned rose. It gives you a nice dark, but more natural red lip. I think it is more romantic than a vivid red lip. Being a more muted red it is more versatile and can easily be dressed up or worn casually. This is the most natural of the shades for me.

Lead the Way

This is a beautiful dark plum. This may be the most purple shade I own. The picture does not do it justice. In person this color is more intense, vibrant, and darker. It calls to mind lips stained by red wine.

Never Say Never

This is a vibrant pink, that is not too cool not to warm. It is very bright and rich. Luckily if you don't feel like rocking an intense lip, you can dab on a touch and just get a nice pinkiness to your lips. Or if you are feeling up for it, play with the full pigment and enjoy an intense pink like candy. You can tone down the shade the same with the other two colors, but I think the effect is nicer with Never Say Never.


     Natural Lip                             Moxie Stand Out      Moxie Lead the Way   Moxie Never Say Never

Monday, April 7, 2014

Hāpu‘u Hawaiian Tree Fern Indoor Care Secrets

In my trials and tribulations growing the Hāpu‘u, I have learned some key tips for caring for your Hawaiian tree fern to make them happy and lush. Now I will share those secrets with you!

(Specific instructions below)

Yes that is snow outside my window, but look how happy my tree fern is!

I love Hāpu‘u. They are beautiful and majestic. Gentle yet strong fronds unfurling and reaching toward the sun. Being able to enjoy them everyday allows you to bring a little tropical fantasy into your life. I live in temperate zone 5 so there is no way for me to grow tree ferns outdoors. We get harsh winters, bitter freezes, and short growing seasons, therefore I am limited to indoor care. However caring for Hawaiian tree ferns in your home is very difficult. With air conditioning and heating making household air dry and limited sunshine indoors maintaining certain tropicals is a balancing act. They require specific water, heat, humidity, and food.

There is also a lot of false/bad information out there about tree ferns from individuals lumping them in with regular ferns. Unfortunately information specifically geared towards Hawaiian tree ferns is limited. I have found significantly more information on Australian tree ferns, some information on outdoor care of Hawaiian tree ferns in similar climates to their native areas, but very little on care indoors.

One of the first myths I want to rid you of is that tree ferns don't like too much water. Some ferns can't handle a lot of water, but Hawaiian tree ferns mostly come from very wet areas. They need water, especially consistent water. Perhaps the worst thing you can do to a Hawaiian tree fern is to let it dry out.

So, how do I keep my Hawaiian tree fern consistently moist?
  • Peat
  • I keep my Hāpu‘u in a more peaty than loamy soil. I hand mix the soil for my tree ferns. To make sure that the soil will retain moisture well I generally mix mostly peat with some potting soil and some dried moss. You can also add some lava rock to create air pockets for the roots. This means that it retains humidity and moisture in the soil better. It is not as well draining as loam, but this is a good quality to have in soil geared towards the Hawaiian tree fern.
  • Water reservoir
  • I also took my moisture a step further and converted a regular pot into a water reservoir pot. This is very easy to do and garden stores now sell adapters to convert pots in to reservoirs or you can buy pots pre-fitted. I purchased my reservoir kit from Gardener's Supply.
I don't know if you can tell yet, that I am serious about the water. ;)
  • Hydro-Mats
  • I even go so far as to line my pots with hydro-mats to ensure my humidity levels stay up within the pot. These mats absorb water, hold it, then slowly release it back into the soil.
  • Terra-Sorb
  • This is another good product for maintaining continuous moisture. Terra-sorb is basically little crystals that swell up into gel when wet so that the plant has access to more water throughout the soil. Just make sure you don't go overboard with the amount you put in the soil. Your tree fern still needs to be able to breath. Do not drown your plant in water absorbing gel. A small handful should suffice.
  • Water from the top
  • Your tree fern will truly appreciate being watered over its trunk. A significant amount of the root is there. Since the Hāpu‘u is a fern, it has a shallower root system than many other plants. This is why it needs such consistent moisture. When you water from the top you are ensuring that the base receives water. This also makes the fur on the base wet which will hold even more moisture. Another tip is to water with warm water; I think it is more effective.
  • Misting
  • Misting occasionally can also increase the humidity in the air around your tree fern or you could even go so far as to put a humidifier next to your tree fern. This is not necessary, but your tree fern would most likely love it. In the winter months misting can really make a difference. You can also just put out the standard tray of water and pebbles for surrounding humidity.

Not to be contradictory, but make sure your tree fern is moist, not wet. Do not drown your Hawaiian tree fern. They do not want to sit in water. In other words, they do want to drain.

Heat, Food, and Light
  • Your tree fern will want moderate light. Be careful because the fronds can burn. They do not need significant light though and can do just fine with indirect sunlight in your house, however you will see the fronds fan out toward the window to optimize their photosynthesis.
  • The Hāpu‘u likes moderately acidic soil and it likes to be fed. I like to feed mine every once in a while with some watered down coffee. You don't want to burn your tree fern with hot coffee or too much coffee(ie too high acidity). They do like to be fed though, so go ahead and give it a little fertilizer or coffee every so often. Feed it less in the winter since its growth will be down. Sometimes when you feed your tree fern it may mold since it is encased in fur. You can just wipe off the mold gently and it should be fine.


Here are two tree ferns that I am starting out. They are both on heating pads and will hopefully take off when the weather gets better. Unfortunately we got these in the dead of winter, so they are not at their growth peak and it is harder to get them started.
  • Heating your fern
  • To encourage root growth I like to set my Hāpu‘u's pot onto a plant heating pad. This keeps the soil nice and warm, like it would enjoy at home in Hawai'i. The roots should grow deeper and the plant will grow faster. The deeper you can establish the roots the better. This will help you in stabilizing your tree fern for watering and overall health. This is especially important when you are establishing a new Hāpu‘u!!! As a rule of thumb I always have a new Hāpu‘u on heating pad so that I can ensure it takes off.
Troubleshooting.
  • Brown and brittle frond tips
  • When I first started with tree ferns I had the issue that all of my fronds would come out beautifully but then each one would slowly crumple down from the tips. They would turn brown and shrivel up. This was a result of not giving the tree fern the appropriate amount of water. If you are able to keep the moisture level up this should not happen. When I corrected this problem the browning stopped. Any time however that I am not religious with my watering, I may lose parts of my fronds. I must be especially careful in the winter.
  • Winter
  • In the winter your room will be both colder and drier, so growth will significantly decrease. This is normal. Your tree fern's growth should pick up as the weather warms up again and your Hāpu‘u will throw out more new fronds again.

Here is a new frond coming out of my established tree fern. It is just waiting to pop. You can also see a little mold, because I recently fertilized. I will scrape it off gently with a knife.

With these tips you can successfully grow a Hawaiian tree fern and enjoy a little Hawai'i in your life! Good Luck!!!

For some additional information, here is an article from the University of Hawai'i at Mānoa. It is more targeted toward growing Hawaiian tree ferns in Hawai'i and outdoors, but gives some great and substantial information about the Hawaiian tree fern.

People Watching: the Great Human Hobby

People watching stuff (6612658911)
cc photo By Andrew Bowden from London, United Kingdon; titled: "People watching stuff"

Get your fix today!


We all love to people watch. It is programmed into our brains. When we watch others we are reading social cues that would have been important to our earliest ancestors. We have the ability to learn a lot of information about those around of us simply by watching them. You can perceive moods, relationships, statuses, events.

For example, I think celebrity obsession is just a manifestation of an instinctual need to monitor hierarchies and social relationships. We fulfill our base social needs through people watching, and celebrity obsession is just another form of people watching. Just like with monkeys, it would have been and is still beneficial to watch others. Man is an innately social creature. Sure there are people who just want to be left alone, but as a species we need social interactions.

You have to admit that there is something almost meditative about watching people. There is a reason why window tables are prime locations in restaurants. If you are able to watch people walking by, you receive added entertainment and pleasure with your meal.

People watching is cathartic. It's as if you can experience multiple lives in those moments of watchfulness. Watching children smile and run around, as their parents proudly watch their little sprouts. Admiring an elderly couple's time tested love on display. Witnessing how other people interact with the world and others. I believe that the act of people watching is beneficial to one's being. When you people watch you are almost exercising and expanding your abilities for empathy. To truly get the full experience of people watching, you need to put yourselves in the other people's shoes, whether you can relate to them or not. This improves interpersonal understanding. People watching is an extra perceptive form of visual listening. It takes time, skill, and patience, but I believe that it is worth it.

Don't go stalking people, but do take a moment here or there to appreciate those around you. Get a tangible feel for the fabric of our society which is woven in people, lives, interactions. Go step out into the world with your inner eye truly open to those around you and feel the benefits that you will reap within and that you will sow back into the community with your heightened awareness.

Saturday, April 5, 2014

Tip of the Day: Beware Hostile Warrior Artichokes


How to not end up with a mouthful of thorns, by picking a good artichoke.


I love artichokes, but they don't always love me. They are delicious and they are nutritious. I especially love roasted artichokes or spinach and artichoke dip.

What to look for in an artichoke:
  • young
  • tender
  • tight
  • squeaky


I had decided last week that I was going to make oven baked artichokes. I found the perfect recipe online. It was very simple and stayed true to the flavor of the artichoke. I doused my 'cut to size' artichokes with lemon juice, lovingly placed a crushed garlic clove and a pinch of salt in its heart, poured olive oil over it, and after wrapping it in aluminum foil let it bake in the oven for 1 1/2 hours.

Don't forget that when you enjoy artichokes, you are basically enjoying a giant thistle. Artichokes have nasty little thorns, because they don't really want to be eaten. They are out to get us! Luckily if you get young artichokes they haven't built up their anti-human defenses as much.

In my naiveté, having never made artichokes before, I had picked really old seasoned warrior artichokes. It was a battle even picking them out at the grocery store as they stabbed at my hands and tore my vegetable bag. I should have known that a vegetable putting up that much of a fight should probably be left alone.

Fast forward a few days after the grocery store and I have finished baking my artichokes. They smell DELICIOUS! A kind of nutty, sweet, and garlicky aroma fills the house. My excitement rises and my mouth awaits the feast. I unwrap them. I dig a spoon into the molten heart and take a bite. Chew... Chew... I stop. My mouth is now filled with little needle like thorns. Even the very heart of the artichoke has vicious little thorns. I believe I have failed and whip up quick open faced avocado sandwiches and salad, brooding over tasty yet terrifying artichokes.

I have found out that the artichokes I bought were much too old. I shouldn't have bought them in the first place. Younger artichokes would not have been so scary. Keep in mind that I was not oblivious to the thorns. I had carefully cut them all away and trimmed the stalk and the head. Unfortunately these artichokes were so mature that they had grown thorns on even the tiniest of petals within the heart.

The moral of the story is that you should not trust your grocery store and definitely do not buy old artichokes or you and your mouth will regret it. I have since learned from my father that a good artichoke for cooking should squeak when you squeeze it. Also the general rule of thumb 'that if it is heavier it is better' does not apply to all vegetables/fruit, especially artichokes. You want a nice young, tender, tight, and squeaky artichoke. I hope no one else shopping at that grocery store bought those artichokes and suffered the same disappointment I did. Just remember that you should always try your food before you serve it; if I hadn't everyone would have ended up with a painful mouth full of thorns. I don't recommend it.


Happy artichoke making all! Please share any of your cooking mishaps or tips for success!

Friday, April 4, 2014

Quick & Healthy My Go To Salad!

Color is Yummy!


Salads are simple. They're fast & they're delicious. This is one of my favorite salads!


  • Chopped Romaine Lettuce! Yum! A lettuce with a lot of flavor and more nutrient rich than iceberg lettuce(For bunny lovers iceberg lettuce is not a good nutrient supplement/treat. Iceberg lettuce is like the candy of the lettuce world.).
  • A source of calcium, minerals, vitamin B6, folate, biotin, vitamin B1, vitamin B2, pantothenic acid, omega-3 fats, vitamin A, vitamin C, and vitamin K.
  • Cucumber. Refreshing. Crisp. Nutritious.
  • A source of minerals, pantothenic acid, vitamin B1, biotin, vitamin C, and vitamin K.
  • Red Onion. A punch of flavor & it looks lovely in a salad.
  • A source of minerals, biotin, folate, vitamin B6, vitamin C, and vitamin B1.
  • Tomatoes! Bam! Color!
  • A source of minerals, vitamin C, biotin, vitamin K, vitamin A, vitamin B6, folate, vitamin b3, vitamin E, vitamin B1, and pantothenic acid.
  • Avocado. A beautiful green and an even more beautiful texture.
  • A source of minerals, pantothenic acid, vitamin K, folate, vitamin B6, vitamin E, and vitamin C. Highly nutrient dense and oh so creamy!
  • Pumpkin seed. I love a little crunch in my salads and that nutty flavor really adds another level.
  • A source of minerals especially manganese, copper, magnesium, and zinc. Considered one of the best food sources of zinc.


Put it together and dish it out.

Just think of all the nutrients you are getting, how great you will feel, and how delicious it will taste! I love this salad!

The Magical Sponge: The BeautyBlender

I am loving the BeautyBlender!

Retails for $19.95 at Sephora

Reasons to Love:
  • It is super cute!
  • Who doesn't love a little squishy tear shaped sponge that comes in lovely colors (especially their standard cuddly pink color).
  • It feels nice.
  • Lightweight and cushy it glides over your skin.
  • You only need one!
  • This is the makeup tool you get when you only want to use one tool and you are done with your pile of makeup brushes.
  • Most importantly it gets the job done superbly!
  • It really does blend foundations, concealers, etc into your skin beautifully. The BeautyBlender gives you perhaps the most natural effect with your makeup.

How do you use it?

It comes with an adorable little use and care instruction pamphlet that tells you pretty much everything you need to know.

Basically you use the BeautyBlender when it is damp. So you run it under the faucet to dampen it and then gently squeeze out any extra water. If you are wondering why, I think it makes sense. I would assume that they are telling you to dampen your Blender so that it wont absorb as much of your product. Also so that it will glide over your skin better, giving you the natural effect which is why you bought it in the first place.

I apply my BB cream and concealer with the BeautyBlender. For my BB cream I place the product on the back of my hand and, after dampening my Blender, I use the Blender to place the product on the areas of my face that need the most coverage. I do this with a swiping motion. Then I stipple it into my skin with a dabbing motion. I cover my whole face using this swipe and dab technique. This has been one of the best ways I have used the Blender.

For my concealer I just dab so that I get a thicker coverage.

Sometimes I apply my BB cream with my hands by lightly massaging it all over my face. Then I come in with the BeautyBlender and dab over the product to give it a nicer more natural finish. My favorite face brush used to be the Sephora Professionnel airbrush concealer 57 because it would feather my concealer onto my face giving me a barely there effect. With the BeautyBlender I get a similar effect with less effort.

How do you clean it?

I contemplated using some of my brush shampoo to clean the Blender, but decided to purchase the brand's own cleaner. I had read some reviews in which people had said that their BeautyBlender was ruined by using the wrong cleaner. I purchased the BeautyBlender solid sponge cleaner because it travels well and I thought I might be able to get more uses out of it. It retails for $15.95 at Sephora. I have to say that I used up the cleaner pretty fast and am now down to the dredges, so I don't know whether I will by the solid cleaner again or opt for the traditional liquid BeautyBlender cleaner.

It is always sad to see makeup marring my lovely little sponge so for a while I took to cleaning it every day after I used it. I also did this to keep away any bacteria or particles since I have acne prone skin. Please note that when you first clean it some of the dye will come out of the sponge, don't worry the color will just lighten a little. (You can see in the picture above where the tip of my Blender bleached out a little.) I have since taken to cleaning it every other day so I don't stress my sponge too much, because I do not think that it was designed for excessive cleaning and can get little tears and raised patches.

When I clean my Blender with the solid cleaner I wet the sponge and wipe it on the soap gently then I massage the sponge to bring the cleaner to a lather. Then I squeeze out extra water into the sink and with that water goes the makeup that was stuck in the sponge. I use a cow milking technique by close my fingers downward to force out the water, makeup, and cleaner. I then add a little more water to the top and continue till all of the cleaner is out. You can repeat this process to get all of the makeup out of you Blender. Just remember to be gentle. Then when you are done place it on top of its packaging.

Just to geek out about the design.

I love the simple, yet clever design of the BeautyBlender and its packaging. The plastic cylinder that it comes in acts as your drying stand and storage container. You place the damp Blender on top of the cylinder and when it finishes drying it shrinks and falls back into its case to await your next use. I also store the instructions in the lid which I fit under the packaging. It is such a simple design, but considering how many other products don't think to utilize their packaging I am suitably pleased and give them 5 Stars for their packaging design.

Heads Up Easy Stove Top Cappuccino Recipe on its way!

I have long struggled to find a good cappuccino in my area. Cappuccinos are perhaps my favorite way to enjoy coffee beans, but it is practically impossible to make a cappuccino without a $2,000 machine. I have finally figured out how to make a cappuccino on my stove top that comes out better than most of the cappuccinos I get at local cafes. All of my previous attempts using methods I searched on the internet never worked, but now I am having a fresh, creamy, delicious cappuccino practically every day.

I'll share the recipe in a few days! Stay posted.

Saturday, March 29, 2014

My Current Beauty Regimen: Skincare.

If you have difficult skin, you know that finding the right products can be either an adventure or an expensive nightmare. Why does this search last so long? because our skin is constantly changing, growing used to products, aging, reacting to the sun, becoming dry or oily from the weather. Skin is amazing. It protects us. It is our largest organ, but sometimes it is a pain in the butt. Below are my current go to products.

My Skin Type for Your Reference:

  • I have combination to dry skin, but mostly dry. I have a hard time finding products that are moisturizing enough for me.
  • I often have to change up my skincare regimen between seasons, so I don't get too dry or oily.
  • I have acne prone skin and I am more often than not fighting a blemish, so I have to use products that won't break me out.
  • I have to be very careful to not dry out my skin while treating acne.
  • I also have slightly sensitive skin that can get a little irritated now and again.
  • My Complexion

    is neutral to fair with an olive/yellow undertone, and I also can get tan very easily.
However with the right products I have fixed most of my skincare issues.

Let's Start with Cleansers

  • Jose Maran Argan Cleansing Oil

  • This cleanser retails for $32.00 for 6 fluid ounces or $12 for 1.9 fluid ounces at Sephora & lasts for a long time. I love that it cleans my skin and doesn't leave it dry. It replenishes the moisture on my face. Also, since it is an oil cleanser it cleans off my makeup beautifully. Sometimes I use a dab of it on a tissue or cotton pad to remove my eye makeup.

    Never mind the fact that it smells divine (like oranges and sunshine), it really is a great cleanser. It's all natural too, so you don't have to worry about putting superfluous nasty chemicals on your skin. Full of vitamin E, argan oil is a current star child in the beauty world. The cleanser lathers up on your skin nicely into a milky texture and I always feel fresh after. My skin is happier when I don't dry it out by consistently over cleansing with heavy duty cleansers or exfoliates. You only regenerate skin so quickly.


  • Neutrogena Clear Pore Cleanser/Mask

  • I use this cleanser when I feel I need an extra clean or if I feel a breakout coming on. It retails for about $7.00 for 4.2 fluid ounces and can be found at most drugstores and grocery stores (though sometimes I have to look around).

    Since it is both a cleanser and a mask, it is a multitasker. As a cleanser it leaves you squeaky clean, but if you leave it on as a mask your face tingles like your getting a scrubbing bubbles facial and you feel minty fresh afterwards. Just make sure you don't get it in your eyes, you wash your face off well, and you moisturize well post mask.


Eye Creams To Keep the Crows Away ;)

I think that at a certain point we need to accept that smile lines are a sign of good times and life. Take them as a badge of honor not a burden. Have you ever looked at someone older and thought how cheerful they looked, like they have had a good life? What did you notice? probably their deep crinkly laugh lines. In the meantime though, that doesn't mean we have to give in to being life's canvas without a fight!

  • Shiseido Benefiance WrinkleResist24 Intensive Eye Contour Cream
  • At $55.00 for 0.51 ounces from Sephora, Shiseido is my go to eye cream. It is creamy, thick, and very moisturizing. It has burnet extract (Sanguisorba Officinalis Root Extract, basically an herb/bush from the northern hemisphere), Hyaluronic Acid (there's no easy way to translate this one, but it is basically a specific polysaccharide found in connective tissue), and hydroxuyproline (a common amino acid). I'm not sure how effective it is on my fine lines, but I'm holding out hope. It does seem like it smooths out my under eyes for a bit, but eye creams can only keep smiles so far away.


  • Philosophy Miracle Worker Retinoid Eye Repair Cream
  • This eye cream is more expensive priced at $66.00 for 0.5 ounces. I received this one as a sample from an online Sephora order (Take note sample lovers, you get more samples from Sephora if you order online.) and managed to make the sample last for 3 days. I really enjoyed this eye cream and after I do some more research I may buy this one after I finish my Shiseido. It felt rich and creamy, but maybe a little more silky than the Shiseido? This cream's workforce is comprised of retinoids and peptides.


Reinvigorate and Correct with Skin Treatments

  • Ole Henriksen Invigorating Night Gel
  • This one works. It claims to improve fine lines, pigmentation, and breakouts. I do think that I have seen a decrease in pigmentation damage from the sun (read: baby sunspots/light freckles). I'm not positive how well it works on acne and fine lines; I think it may help some, but I can't be sure. The consistency is like a watery gel and a little goes a long way, so your product will last you a while. It has an AHA complex(for moisture and skin renewal), algae (for nutrients), and mucopolysaccharides(to improve the strength of skin). Retails for $45.00 for 1.7 ounces at Sephora.
  • Ole Henriksen Truth Serum Vitamin C Collagen Booster

  • $48.00 for 1 ounce. This serum smells very strongly of oranges. I find the smell pleasant, but I've read others saying that it is too strong. No worries though, that lovely orange bouquet dissipates quickly. This serum uses a vitamin c complex made from 5 sources, green tea extract, and sodium hyaluranate. Vitamin c has healing properties for the skin and green tea is packed full of antioxidants and nutrients as well. Sodium hyaluronate is actually used in plastic surgery to reduce wrinkles. Sodium hyaluronate is the sodium salt from hyaluronic acid and is found in skin tissue. Sounds good to me.

    I find this serum very moisturizing and smoothing. Since I still have relatively young skin I'm not sure of the long term affects of this serum, but I feel like it does leave my skin more plump and happy.
  • Neutrogena Rapid Clear Acne Eliminating Spot Gel
  • $7.88 at the drugstore or grocery store. This is my strong man for spot treating blemishes. It is comprised of 2% salicylic acid, so it packs a bit of a punch. (Increasingly higher percentages of salicylic acid or benzoyl peroxide have decreasing returns. If you go too high on your percentage of acne fighting chemicals you will just dry out and aggravate your skin. More doesn't always mean better1) I try to use this spot treatment sparingly so I can reserve it for when I really need it and don't just aggravate my skin and accustom my skin to high levels of salicylic acid.
  • Peter Thomas Roth Therapeutic Sulfur Masque Acne Treatment Masque
  • Retailing for $40.00 for 5 ounces at Sephora, this is my go to treatment for really deep or persistent acne & the product lasts a long time. With its key ingredients of eucalyptus, sulfur, and clay it works to sooth and purify my nasty little facial felons. I either put it all over my face for a pampering treatment mask or more often I use it as a spot treatment before bed for an overnight mask on stubborn blemishes. I think that it does a pretty good job of decreasing my angry little bumps and who doesn't appreciate shortening a blemish's lifespan?


Let's Get Some Moisture On That Skin

  • Algenist Firming & Lifting Cream
  • This just may be the best moisturizer I have ever used. I have used drugstore moisturizers, specialty moisturizers, and some sephora moisturizers. Out of them all, I'm not sure I have ever been quite so impressed and for $94.00 for 2 ounces I should hope I would be impressed. The price makes me cringe, but I think it's worth it,considering how much my skin is loving it and the fact that I only have one face. It is smooth and silky, creamy and substantial, and yet lightweight and not greasy. You do not lose the moisture throughout the day and I find that when I wash my skin before bed, my face is nice and soft. It also soothed some of my blemishes, reducing their redness and size. I did not expect this result, and at first did not attribute the results to this moisturizer. After reading similar results in the sephora reviews I conceded that it must be the Algenist, since I hadn't changed much else in my products recently. I find these results impressive, since the product doesn't even claim to correct these issues.
  • Ole Henriksen Sheer Transformation
  • This used to be my go to moisturizer. The price is much more reasonable than the Algenist. $58.00 for 2.5 ounces at Sephora, but they also have other sizes and package deals. Until I found the Algenist, this was for sure my favorite moisturizer. It is lightweight, but substantial. There is no significant scent and the consistency is silky if a tinge thin. This moisturizer did not break me out and kept my skin moist even during a harsh winter (read: below freezing). I even got my grandmother hooked on this moisturizer. I was suprised at how effective it moisturized for such a light cream. Perhaps the fact that is so packed with ingredients is what makes it such a strong yet lightweight moisturizer. It has Actiwhite™, licorice, vitamin C, and botanical fruit acids to turnover skin cells and invigorate skin. It also has sandalwood, geranium, and chamomile to sooth your skin.

    My only qualm with the Ole Henriksen line is to do with product consistency and a strange habit of forming a product skin that peels off. Sometimes the moisturizer would come with a funny odor and wouldn't be as smooth. Also every so often the products (I'm not positive which one or if it was a chemical reaction from using the products together.) would create a skin after being applied on the face that would flake off or I would have to pick it off. I also had a friend who tried it, and it gave her a small breakout.

    For the most part though, these things did not happen, and I absolutely loved this moisturizer. It has been the best moisturizer for me ever, until I stumbled upon the Algenist. And as a more affordable option, I may still use this moisturizer off and on.
  • Hourglass N° 28 Primer Serum
  • Comprised of lipid oils, plant oils, and vitamins this may be one of the most luxurious things I have ever put on my skin. Despite its $65.00 for 1 ounce price tag, I LOVE this product & I don't know if I ever want to be without it again. It is the perfect primer! At first I wondered how an oil based serum would perform as a makeup primer, but it does an outstanding job. My makeup goes on exceptionally smooth and lasts almost all day (I could use some touch ups here and there). What makes it truly amazing is that it packs a ridiculous amount of the most luxurious silky smooth moisture. I enjoy the moment when I glide it all over my face and neck. Also I haven't found that it breaks me out. Hurray! For those of you who don't like your skin to feel kind of dewy or moist to the touch, this may not be for you, but for moisture starved skin like mine this is heaven sent.


Don't Forget About Your Smoocher

  • BITE BEAUTY Agave Lip Mask $26.00 for 0.52 ounces
  • So... I'm a lip junky. Not in the 'I have tons of lipstick and gloss' way, but in that I get very dry lips if I don't moisturize them. Lip balms, butter, creams, oils, vaseline, I love them all, but very few give me the amount of moisture that my lips need. I was skeptical about this mask at first, but was amazed at how well it worked when I tried it. I have since been using it not as a mask, but as an everyday lip balm. Its ingredients to note are organic agave nectar, jojoba oil, vanilla CO2 extract, and a super load of trans-resveratrol(the antioxidant in red wine).

    It is very thick, creamy, and smells delicious. I'm not to keen on the taste(since we all know you always end up getting some of your lip product in your mouth this must be noted), but I think the performance more than makes up for that. It has usurped all my other lip moisturizers currently.


Cover, Conceal, Protect

  • Dr. Jart+ Premium Beauty Balm SPF 45 $39.00 for 1.5 ounces
  • I don't know what I did without this BB cream. It is fabulous. I recently tried a bunch of different BB creams and decided on this one. I had wanted to jump on the BB cream bandwagon, because I had been hearing such great things and the skincare promises sounded so superb. Not to mention I have a friend who has always worn BB cream, that she orders from Asia, and her morning coverup process always seemed so easy and fast.

    I partly chose this BB cream because it is Asian(specifically Korean) and I wanted to keep true to BB creams origins. Also I am a little skeptical about every single western brand suddenly jumping all over the term BB cream. More importantly I chose this BB cream because it seems to be perfect for my skin. It is very smooth and not heavy. It glides on easily and blends in to match my skin tone perfectly. It adds a luminosity to my skin, which I love. Not glittery or shimmery, but a natural looking healthy dewiness/glow. I think this is caused by the white gold in it(yep you read that right. I wondered why that was in there too.). It also contains a bio-peptide complex and SPF 45. The HIGH SPF is one of the reasons why I picked this BB cream, because the SPF(it also has broad spectrum... ie uva/uvb) makes it multi-funtional. It only comes in one "universal" shade. I'm not sure if this would work for someone with a very dark complexion. It might come off as ashy, but I'm not sure.

    The coverage is medium to light, but it is build-able. I blend mine in with my Beauty Blender and watch it disappear while lightly correcting pigmentation problems or redness. This is my base for any other concealing or makeup, but I definitely consider this BB cream a skincare item and not just makeup.


(I cannot attest to the complete accuracy of all the information provided.)

Friday, March 28, 2014

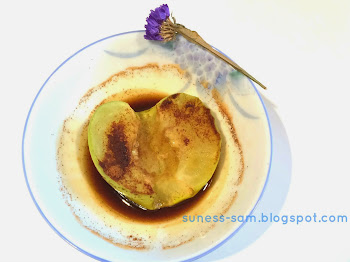
Quick & Healthy Dessert or Snack! Baked Apple.

Gooey, warm, and tasty this baked apple is sure to satisfy your inner cookie monster.


The Finished Product!

Ooey Gooey Deliciousness.


*2 Minutes to Yum!*

Like most people I love desserts and snacks, but often times they aren't good for us or don't fill us up. Why not have something delicious, nutritious, and filling? Often homemade desserts and snacks take a long time to make and involve many ingredients. In this post I will tell you how to make a 2 minute baked apple, a modified version of an oven baked apple.


Your Simple Ingredients

  • Half of a Scrumptious Apple (One full apple makes 2.)

  • Today I used a Granny Smith apple. With its tart, crisp flavor I think that it lends itself well to a baked apple, but feel free to use any apple you love or have. Just keep in mind that your apple is the base to your dessert/snack and a bland apple will only be so good.
  • 2 Teaspoons of Vanilla

  • A splash of vanilla adds another layer to the flavors, making your baked apple more complex and delicious
  • 1 Tablespoon of Brown Sugar

  • I quite like dark brown sugar. The darker the brown sugar the more the flavor.
  • 1/2 Teaspoon of Cinnamon (make it 1 if you really love cinnamon like me or less if you have a small apple.)

  • Cinnamon is super good for you. It's packed full of nutrients and is a leading antioxidant. Most importantly though is that it's delicious! And cinnamon and brown sugar are flavor friends.


Put it Together

  1. Carefully halve your apple & remove the core.
  2. Place it in a bowl that will keep it upright, like in the pictures above.
  3. Pack your 1 tablespoon brown sugar into the center of half the apple, where the core used to be.
  4. Drizzle your 2 teaspoons of vanilla on top of the brown sugar.
  5. Pour all of the 1/2 teaspoon of cinnamon over the apple.
  6. Place your bowl full of goodies into the microwave, cover the bowl (with wax paper or my favorite microwave covers, mine are orange) so it doesn't splatter, & microwave for 2 minutes. Time may vary depending on your microwave. I cooked mine on Quick for 2 minutes. (If you are going to make 2 halves at once they will need to cook longer)
  7. Pull out your hot bowl and enjoy! (but don't burn your tongue!) That liquid in the bottom is your sweet sauce and can be spooned up with each bite.

Enjoy!!!